Submersible ROV for the Trondheim Maker Faire 2014

For the Maker Faire coming to Trondheim later this month, I’m currently building a simple submersible remotely operated vehicle. The concept is based on a plumbing tube used for the housing and submersible electric pumps as motors. A Raspberry Pi with Camera Module will deliver the live video feed via ethernet cable. The remote control is managed via a serial link to a Teensy 3.1 with sensors and motor controllers. The communication will be implemented using MAVLink, which enables the use of the QGroundControl station.

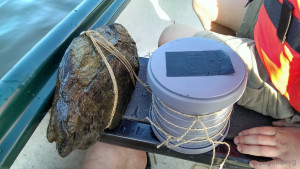
Outer Housing - Testing Outer Housing - with Ballast

After initially testing whether the tube could sustain the pressure at up to 12m water depth, pieces are now falling into place. The serial communication via MAVLink works and just needs a little performance tweaking. It can transmit the manual controls from a game-pad down to the ROV controller and the telemetry back up to the ground station. Telemetry data consists of air-pressure and temperature in the body (MPL115A2) as well as orientation data gathered from the IMU/AHRS (MPU-9150). The ground station visualises the temperature and pressure as line-graphs and uses the orientation information for an artificial horizon.

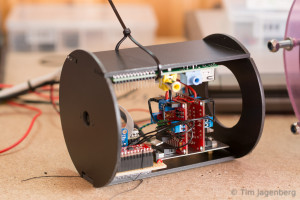
Inner Housing - View on Motor Controllers Inner Housing - View on PiCam and Raspberry Pi

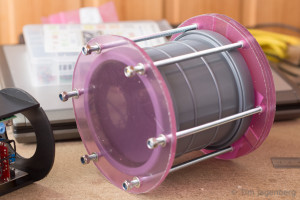
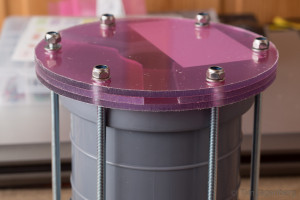
The plumbing tube of the housing is sealed with two acrylic-glass windows. One 6mm one in front of the camera and three 4mm layers in the rear end. The three layers form tunnels for the cables going out to the motors and up to the ground control station. I hope with plenty of silicone this will be water tight.

Outer Housing - Frontview Outer Casing - Channels in the Backplate

If anyone has a good idea how to set up a basin/pool to demonstrate the ROV in, let me know.
Four weeks to go! 🙂

DIY Honda CR-V Replacement Clock

As the dashboard clock of my car failed recently, I was looking for a replacement.
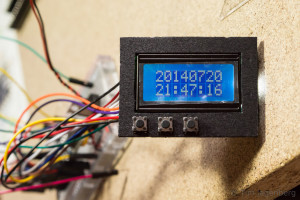
Instead of buying an original part, I opted for a DIY solution based on a cheap Arduino Pro Mini 328, a mini real-time-clock (RTC) module, and a 8×2 LCD display:

Clock Prototype on Breadboard LCD Panel with Buttons

The Arduino and the RTC module talk via I2C and the LCD uses a 4bit wide parallel interface. The LCD backlight can be switched between two intensities. It is wired to two Arduino pins at the same time, one directly and the other via a 1k resistor. The LCD draw less then 40mA. As shorting two pins can be rather dangerous for the MCU, the software needs to ensure that the inactive pin is set to high-impedance input mode before the other one is set active.

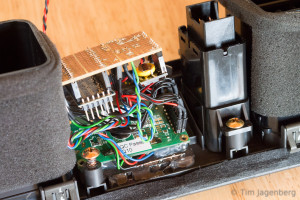
The Internals of the Dashboard Clock The new Arduino based Dashboard Clock

The initial firmware implements setting the time and manual dimming for the night. As the car-connector also offers a 12V wire indicating when the main-lights are turned on, I could add automatic dimming later on.

New Tinker Toys

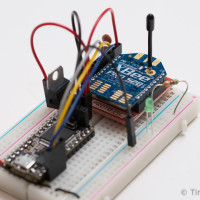
In the recent weeks I found more time for tinkering and received a whole range of new toys: Two bread-board friendly micro-controller boards (Embedded Artists’ LPC1343 QuickStart Board and PJRC Teensy 3.1), the Pi NoIR Camera, two XBee Pro S2B serial RF modules, and plenty of other i2c sensors and generic tinkering supplies. On the EA QuickStart Board, which uses the same MCU as the r0ket, I’m running the microBuilder LPC1343 Code Base and the Teensy 3.1 is Arduino compatible which enables me to make use of a huge range of ready-made libraries for pretty much all my breakout boards.
Embedded Artists LPC1343 QuickStart Board PJRC Teensy 3.1 XBee Pro S2B

One of my current projects is to exchange the micro-controller of my old Graupner mc-17 remote control with the Teensy 3.1. I removed the old processor board and added contacts to all the existing connections: 2X6 poles for analogue measurements of the sticks and trims, and 2X8 poles for the LCD controller and the buttons. The LCD controller is a NEC mPD7225 for which I already found a data sheet. Via the 12bit analogue output of the Teensy, I can even drive the old analogue ammeter at the front of the remote! 🙂
Graupner mc-17 top Graupner mc-17 original controller removed Graupner mc-17 teensy 3.1 controller

Let’s see how well this mc-17 > Teensy 3.1 > XBee ~ XBee > Teensy 3.1 remote control chain works 😉

Cheers
Tim

RPi2C

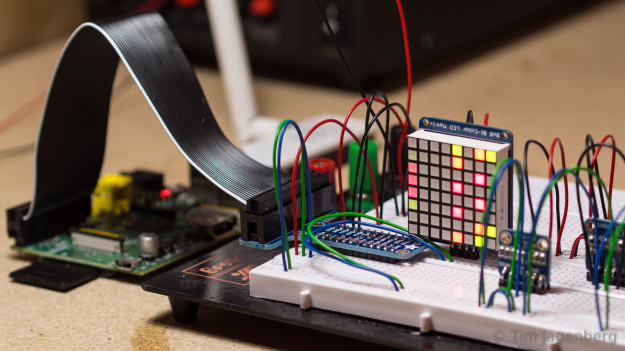
I recently ordered a bunch of I2C breakout boards to tinker around with. The first thing I implemented, using the Pi4J library, was a simple eight by eight version of Conway’s Game of Life using an I2C controlled bicolor LED matrix from Adafruit.
I2C 8x8 Game of Life

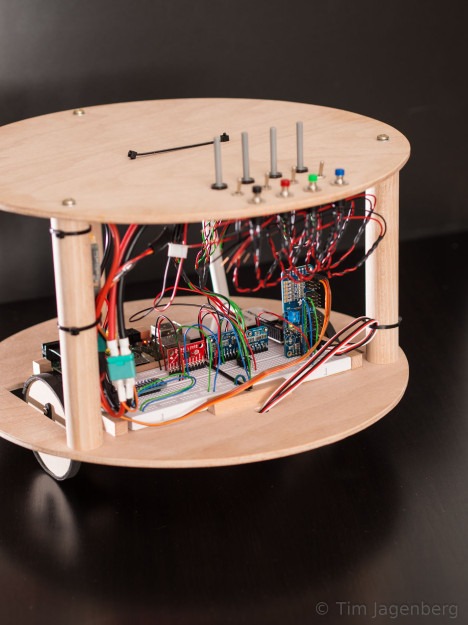
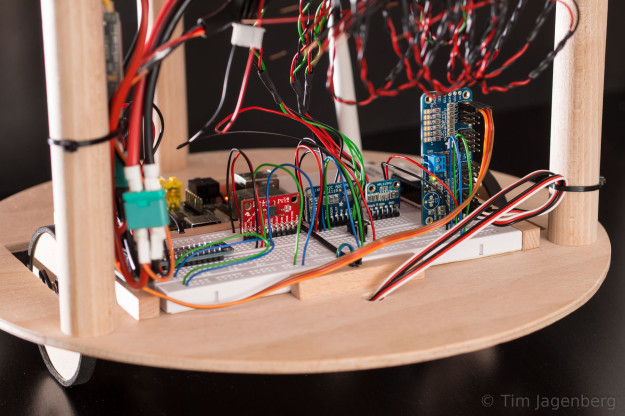
Next I build a simple two-wheeled robotic platform (RPi2C) to test the 9DOF MPU9150 breakout board from Sparfun. This little chip integrates accelerometer, gyroscope, and magnetometer into a single package and also includes what Invensense calls a digital motion processor for on-board sensor fusion.
RPi2C RPi2C

The two wheels are driven by basic Parallax continuous rotation servos and controlled by the same I2C based PCA9685 breakout board from Adafruit I already used on the RaspberryPylot. As the MPU9150 DMP requires uploading of firmware via I2C which I still need to implement, I’m currently simply using the raw gyro data and a PID controller for very basic stabilisation. Also the low rotational speed of the servo motors limits the ability to recover from disturbances. Fusing the sensor data of the accelerometer and the gyro, an improved controller, and maybe stronger motors should deliver better results, soon.

The platform also includes a basic bread-board, a bunch of potentiometers, switches, and buttons, as well as an ADS1115 16-Bit ADC and a SX1509 16 Output I/O Expander for happy tinkering. 😉

Maiden-Flight RaspberryPylot

RaspberryPylot made it!
With perfect weather and a great ground-team supplying me with food, the RaspberryPylot successfully completed its maiden-flight today. A laptop with gamepad, a wifi-connection using two simple USB dongles, an I2C servo controller and a Raspberry Pi and it’s ready to go:


Control via the gamepad was very comfortable and easy. Two analogue sticks for elevator, rudder, and ailerons. Two buttons to increase and decrease throttle and another two buttons to control the ailerons as flaps (flaperons). We didn’t test the master/slave mode today, but one can attach two gamepads and use one master button to switch between both with independent control profiles for each mode. In principle one could pass over the control of only one single axis at a time.

Many thanks to the CRRCSim team for creating such a fun way of training pre-flight.

Cheers
Tim

One Social Web

As the current issues with privacy in social networks start to get a lot of attention from the online society as well as traditional media, I though it would be time to have a look around for alternatives. And indeed I found interesting new solutions to this “old” problem. But let me start by analysing the current state of social networks.

Many of the popular existing social networks have a certain focus; from a German perspective this would be MySpace for bands/music, StudiVZ or Facebook for the student life and Xing for the business networking. Based on these distinctions, they also attract different social groups. Though this diversification and competition itself should be considered useful for the end user, it leads to separation. Most of us will know the situation, where some real-life friends are on one social network and some are on another. As the existing networks do not talk to each other, the only solution to stay in contact with all your friends, is to join a number of popular social networks:
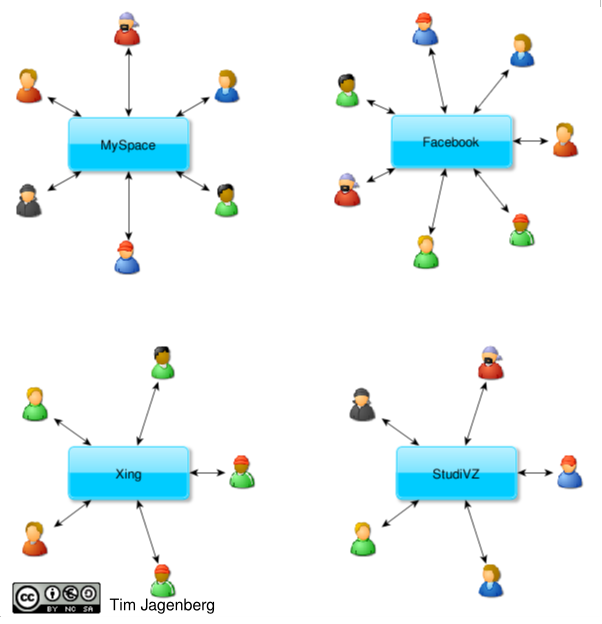
separated social networks, not talking to each other

Another issue arises, when one of your social networks decides to change its policies in an unacceptable way. Currently you have two choices in this situation: leave the network and loose contact to those friends or accept the uncomfortable changes and for example show more information publicly than you intent to.

The image described above changes dramatically if we look at how many people with their web-based e-mail accounts. One friend is registering with GMail, another one with his ISP and yet another one (a geek like me 😉 ) is running his own e-mail server. Yet noone wonders that UserA@gmail.com can send a mail to User2@t-online.de! And even that geek renting a server or running his own infrastructure can obviously communicate with both of them. Should one of the e-mail providers turn rogue, a user can just get a new e-mail account at a different provider and still stay in contact with all his friends and colleagues in his address book.
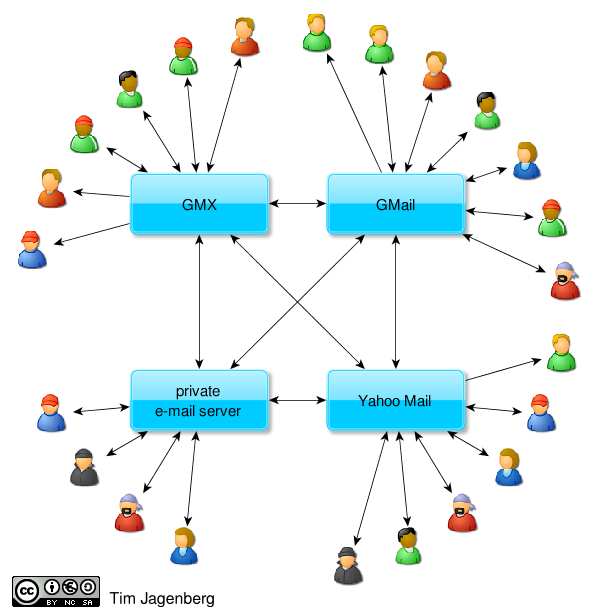
how e-mail currently works

Wouldn’t this be nice for social networking?!

Well, this is basically what OneSocialWeb (OSW) provides! Based on the communication protocol XMPP (formerly Jabber), which is standardised by the Internet Engineering Task Force (IETF), OSW provides a social networking experience, which is very similar to web-mail. Individuals (like me) or commercial organisations (like GMX or GMail) can run their own social networking platform and the individual end users registered at these platforms can freely communicate with each other. OSW supports the known ways of communication in social networks, like creating realtionships between people (“friend”, “follow”, …) and exchanging updates on current activities. Similar to e-mail, the end user can just switch the social networking provider, without loosing contact to his friends.
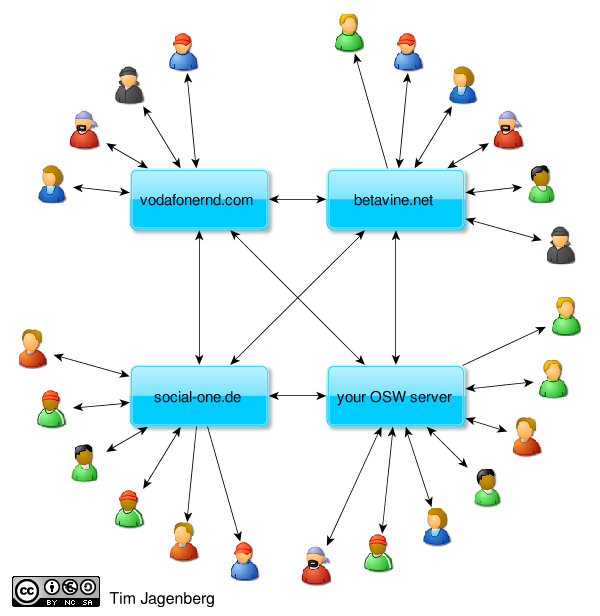
how OneSocialWeb works

If you are interested in trying out this new approach to social networking, write me an e-mail or a comment, and I can create a testing account on http://social-one.de/, which is a test platform without commercial intent, hosted on a rented server.
Currently there are three ways of interacting with the system:

  • A traditional web based client (http://social-one.de/), which would be familiar to most users coming from traditional social networks. As this is still in alpha stage, it does not provide the full functionality, yet.
  • A graphical client for Android devices, which I couldn’t test so far, as my old Android 1.5 is not supported. (If anyone can report on this, please write a comment)
  • A text based client on the console, which is not exactly the most convenient way of interacting, but it is the client supporting most of the current functionality of OSW.

I hope this is a helpful introduction to federated social networking. Many thanks to all the developers around the OSW project, you’re doing a great job!

Cheers
Tim