Smart-Greenhouse

I’m working on my DIY Smart Greenhouse …

  • Automated heater control, ? check
  • Automated ventilation control, ? check
  • Remote monitoring and configuration, ? check


Now that the greenhouse has a comfortably controlled atmosphere, it is time to move the tomatoes and chillies outside and into their new smart home. I prepared the earth and filled the pots, now it is time that the first plants follow.


RPi2C

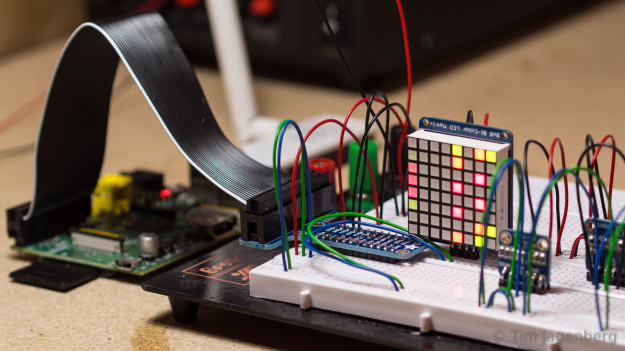
I recently ordered a bunch of I2C breakout boards to tinker around with. The first thing I implemented, using the Pi4J library, was a simple eight by eight version of Conway’s Game of Life using an I2C controlled bicolor LED matrix from Adafruit.
I2C 8x8 Game of Life

Next I build a simple two-wheeled robotic platform (RPi2C) to test the 9DOF MPU9150 breakout board from Sparfun. This little chip integrates accelerometer, gyroscope, and magnetometer into a single package and also includes what Invensense calls a digital motion processor for on-board sensor fusion.
RPi2C RPi2C

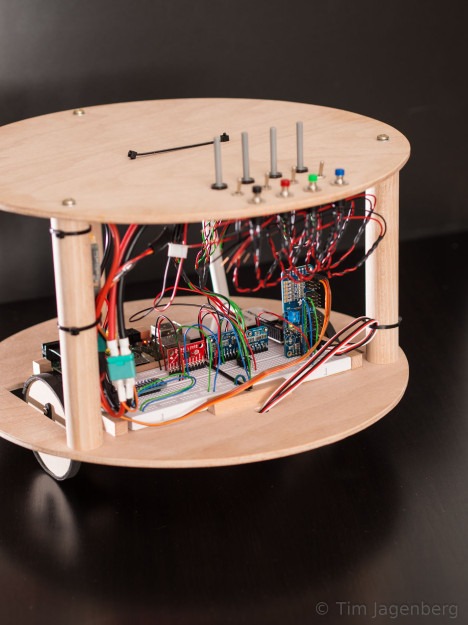
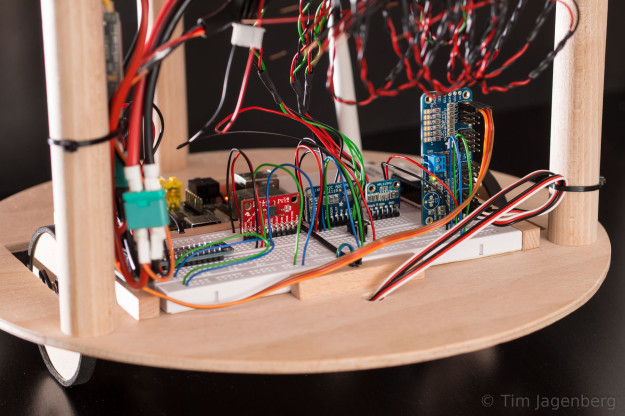
The two wheels are driven by basic Parallax continuous rotation servos and controlled by the same I2C based PCA9685 breakout board from Adafruit I already used on the RaspberryPylot. As the MPU9150 DMP requires uploading of firmware via I2C which I still need to implement, I’m currently simply using the raw gyro data and a PID controller for very basic stabilisation. Also the low rotational speed of the servo motors limits the ability to recover from disturbances. Fusing the sensor data of the accelerometer and the gyro, an improved controller, and maybe stronger motors should deliver better results, soon.

The platform also includes a basic bread-board, a bunch of potentiometers, switches, and buttons, as well as an ADS1115 16-Bit ADC and a SX1509 16 Output I/O Expander for happy tinkering. 😉

Maiden-Flight RaspberryPylot

RaspberryPylot made it!
With perfect weather and a great ground-team supplying me with food, the RaspberryPylot successfully completed its maiden-flight today. A laptop with gamepad, a wifi-connection using two simple USB dongles, an I2C servo controller and a Raspberry Pi and it’s ready to go:


Control via the gamepad was very comfortable and easy. Two analogue sticks for elevator, rudder, and ailerons. Two buttons to increase and decrease throttle and another two buttons to control the ailerons as flaps (flaperons). We didn’t test the master/slave mode today, but one can attach two gamepads and use one master button to switch between both with independent control profiles for each mode. In principle one could pass over the control of only one single axis at a time.

Many thanks to the CRRCSim team for creating such a fun way of training pre-flight.

Cheers
Tim

First Steps towards RaspberryPylot

I’m working on using the Raspberry Pi as a remote control replacement. The “chain of command” goes as follows:

USB-Gamepad > Laptop >TP-WN722NC
~~~802.11n~~~
TP-WN722NC > Raspberry Pi > I2C > PCA9685 > Servos & Motor Controller

So far so good, everything seems to be working with acceptable low latency. I’ll just need to code some security measures, if the signal is lost (motor off and servos positioned for a slight turn).

As the last weeks were rather busy and I was stuck with a bad cough, I’m still not completely finished with the Easy Star II. As the Raspberry Pi won’t fit completely into the fuselage, I’ll have to adapt the canopy for it:

I made some of the code used available on github.

I2C Hacking with the Raspberry Pi!!!

As my Adafruit “16-Channel 12-bit PWM/Servo Driver – I2C interface” arrived today, I got me a Breadboard and all necessary utensils (including a little I2C temperature sensor for first tries) from the local electronics store. I haven’t been playing with hardware in a looong time, so I’m really looking forward to this.

After soldering a I2C connector for the Raspberry GPIO port it was a quick breeze to set everything up and use i2cget to find out that it is 23degC in my livingroom 🙂


Raspberry Pi arrived!

After ordering quite a while ago, my Raspberry Pi arrived last week:

The Raspberry Pi is tiny but complete ARM architecture based single-board computer with the power comparable to a two-year-old smart-phone. Insert an SD card as a hard-drive and you’re ready to go!

There are two things I have in mind with this little fella: An XBMC based media centre or a Raspberry Pi controlled model car. The former I already tested using Linux based distributions like OpenELEC or RaspBMC, the latter will require an additional board, interfacing the Raspberry Pi with PWM based model servos via I2C. Luckily Adafruit is supplying exactly that: “16-Channel 12-bit PWM/Servo Driver – I2C interface”

Let’s see where things go with the RPi-Rover 🙂